How to repeat header in Excel Smart Trick:

How to repeat header/ repeat specific rows or columns on every printed page. This ways is works in every version of MS Office i.e. Excel of Office 365, Excel for Office 365 in Mac, Excel 2003, 2007 onwards so on.

If you required to print more than one printed page, you can label data by adding row and column headings that will appear on each print page. These labels are also known as print titles.Follow these steps to add Print Tiles to a worksheet:

  1. On the worksheet that you want to print, in the Page Layout tab, click Print Titles, in the Page Setup group):

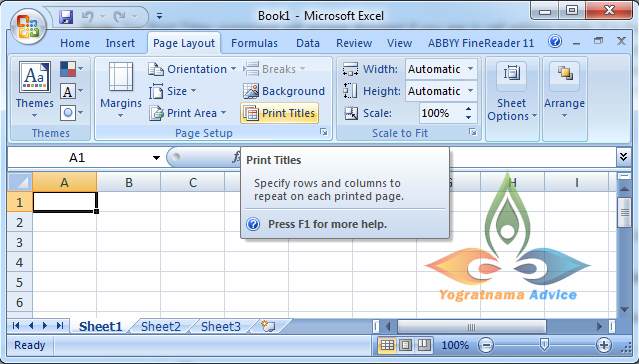
Note: The Print Tiles command will appear dimmed if you are in cell editing mode, if a chart is selected on the same worksheet, or if you do not have a printer installed.

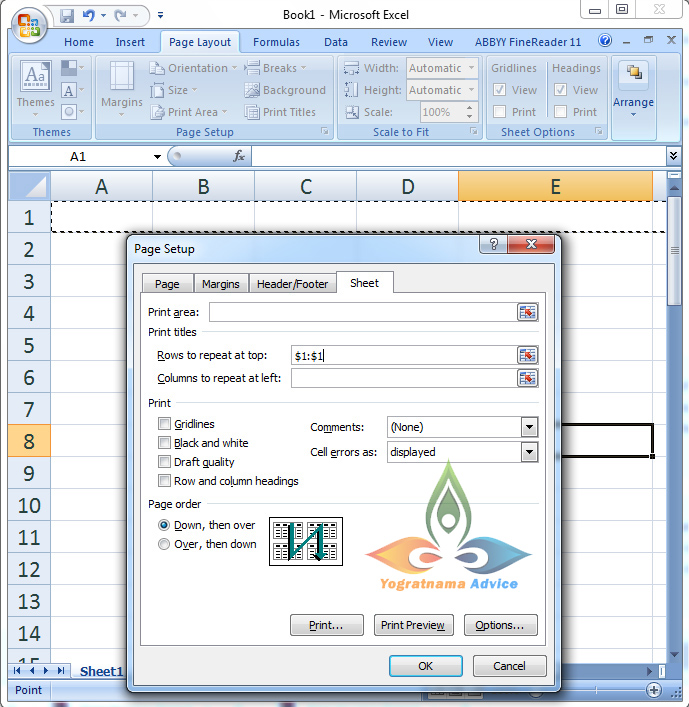
2. In the current dialog box, on the Sheet tab, under Print tiles, do one or both of the following:

  • In the Rows to repeat at top box, enter the reference of the rows that contain the column labels.
  • In the Columns to repeat at left box, enter the reference of the columns that contain the row labels.

                For example, if you want to print first column labels of the current worksheet at the top of every printed page, you could type $1:$1 in the Rows to repeat at top box, which is shown in the snapshot pasted below:

Second Example, if you want to print second column labels of the current worksheet at the top of every printed page, you could type $2:$2 in the Rows to repeat at top box, shown in the aforesaid snapshot. You can change only the number of column label for third Rows i.e. $3:$3, the selected column labels are highlighting by running ant motion, that’s it.

How to repeat header in Excel Smart Trick (Method 2)

Excel Shortcut Keys for Dialogs:  You can also open the Print Titles option by pressing the following shortcut key, which is much easier rather than following the aforesaid method given above:

Press Alt+P and thereafter Press I

Dear, readers thanks for reading my article: “How to repeat header in Excel Smart Trick”

Introduce Yourself (Example Post)

This is an example post, originally published as part of Blogging University. Enroll in one of our ten programs, and start your blog right.

You’re going to publish a post today. Don’t worry about how your blog looks. Don’t worry if you haven’t given it a name yet, or you’re feeling overwhelmed. Just click the “New Post” button, and tell us why you’re here.

Why do this?

  • Because it gives new readers context. What are you about? Why should they read your blog?
  • Because it will help you focus you own ideas about your blog and what you’d like to do with it.

The post can be short or long, a personal intro to your life or a bloggy mission statement, a manifesto for the future or a simple outline of your the types of things you hope to publish.

To help you get started, here are a few questions:

  • Why are you blogging publicly, rather than keeping a personal journal?
  • What topics do you think you’ll write about?
  • Who would you love to connect with via your blog?
  • If you blog successfully throughout the next year, what would you hope to have accomplished?

You’re not locked into any of this; one of the wonderful things about blogs is how they constantly evolve as we learn, grow, and interact with one another — but it’s good to know where and why you started, and articulating your goals may just give you a few other post ideas.

Can’t think how to get started? Just write the first thing that pops into your head. Anne Lamott, author of a book on writing we love, says that you need to give yourself permission to write a “crappy first draft”. Anne makes a great point — just start writing, and worry about editing it later.

When you’re ready to publish, give your post three to five tags that describe your blog’s focus — writing, photography, fiction, parenting, food, cars, movies, sports, whatever. These tags will help others who care about your topics find you in the Reader. Make sure one of the tags is “zerotohero,” so other new bloggers can find you, too.

Design a site like this with WordPress.com
Get started